Keep Your Factory Floor Vision AI Accurate at Scale With Roboflow


Picture this: a defect is detected on line three. Before it reaches the next station, an alert fires, the operator is notified, and the detection is logged with a timestamp, a confidence score, and a camera ID. No one had to be watching. The system caught it.
That is what factory floor vision AI looks like when it is actually working. Not just a model running inference in the background, but a live operational layer that converts what your cameras see into decisions, alerts, and data your team can act on.
Most teams focus on building the model. The harder problem, and the one that determines whether the system delivers real value, is building the infrastructure around it: the right data strategy, the right deployment architecture, the right feedback loop. That is what turns a working prototype into a system your floor can depend on.
This is the blueprint for getting there with Roboflow.
How to Deploy Vision AI with Roboflow
Once your use case is defined, the next step is deployment. This is where a working model is turned into a system that runs reliably in real conditions. Roboflow’s visual AI platform provides a structured approach to move from prototype to production, covering setup, data, and continuous improvement.
1. The Physics of the Sensor
Your camera is the API to the real world. Everything downstream, your model, your detections, your measurements, is only as reliable as what comes through that lens. In a real factory environment, two things will quietly break your system if you don't account for them upfront: lens distortion and inconsistent lighting.
- The Lens Distortion Trap: Wide-angle lenses are popular on factory floors because they capture more of the scene. The tradeoff is fisheye distortion: straight lines curve, grids misalign, and your coordinate system drifts. In a lab, this is easy to overlook. In production, it turns a reliable model into an unreliable one.
- The Production Fix (Intrinsic vs. Extrinsic): Roboflow Workflows lets you build distortion correction directly into your inference pipeline. The Camera Calibration block undistorts the image before it reaches your model. The Perspective Correction block then maps the angled camera view into a normalized top-down view, carrying corrected coordinates through to any downstream measurement steps.
- Lighting as a Variable: Factory lighting changes throughout the day: shift changes, sunlight through windows, and shadows that weren't there in the morning. Roboflow handles this at both stages: Auto-Adjust Contrast normalizes lighting across training images, and the Contrast Equalization block in Workflows corrects for it at inference time, including uneven scenes where parts of the frame are darker than others.
Getting clean, consistent input is the foundation, but a model that works on day one still needs a way to stay accurate as real conditions drift away from what it was trained on.
2. Standardize the Physical Setup
Scaling a vision system across multiple factory lines isn't just a software problem. If the camera is mounted three feet above the table at a 45-degree angle on line one, that exact setup needs to be documented and replicated on every other line. Small physical variations that are easy to compensate for in a lab become real sources of error in production, and they'll show up as unexplained confidence drops in your Roboflow monitoring dashboard before you ever figure out the physical cause.
- Standardize your mounts and angles: Use rigid, industrial-grade hardware and define a fixed mounting angle and height. Even a small shift in camera position can break the perspective transform you configured in your Roboflow Workflow, meaning the coordinate normalization that worked on line one is now feeding the model a slightly different view on line two.
- Standardize your distance, field of view, and background: Keep the camera-to-object distance and visible area consistent across setups. If the scene changes too much from one line to another, your model is effectively seeing inputs it was never trained on, and Roboflow's Model Monitoring will reflect that as a drop in average confidence per device.
- Standardize your lighting setup: Keep lighting direction, intensity, and placement as consistent as possible. Roboflow's Contrast Equalization block can handle gradual lighting variation at inference time, but it works best when the physical baseline is already controlled. The more stable your lighting, the less correction work the pipeline has to do.
- Standardize across sites with Device Manager: Once your physical setup is documented, Roboflow's Device Manager lets you deploy the same Workflow across every edge device in your fleet from a single dashboard, no manual updates per site. And with custom metadata, you can tag each inference with a location identifier like`warehouse_a` or`line_3`, so if one site starts underperforming, you can isolate it in Model Monitoring immediately rather than diagnosing the whole fleet.
 will reflect that as a drop in average confidence per device.
A documented, repeatable physical setup reduces the variables your model has to deal with, but it doesn't eliminate them. Over time, conditions change, and your system needs to be built to catch that.
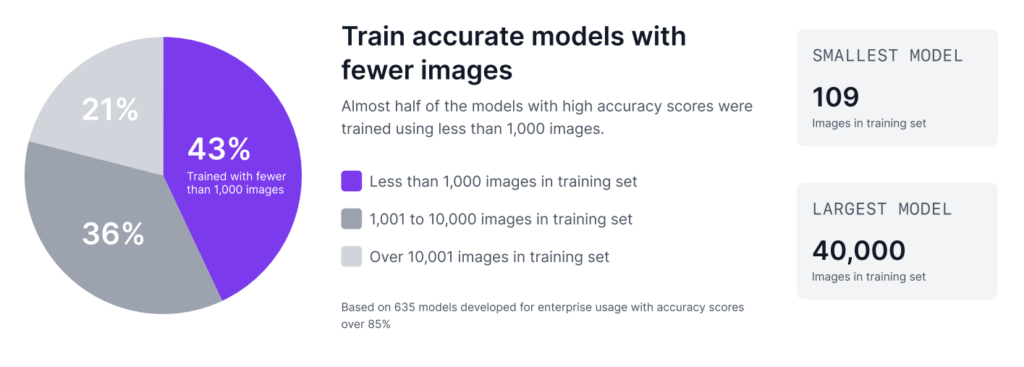
3. Smart Data Strategy
As Roboflow’s Trends in Visual AI report reveals, custom visual AI is often less data intensive than many teams expect. 43% of enterprise models with top accuracy scores were trained on fewer than 1,000 images. Furthermore, many successful enterprise models are built with just a few hundred images.
Step 1: Build a proof of concept with 50 images
You can build an initial proof of concept with around 50 images using Roboflow. But that should be treated only as a feasibility check, not as a production-ready model. At this stage, the goal is simply to show that vision can solve the problem and demonstrate that the use case is worth pursuing.
Here's how to do it in Roboflow:
- Upload and annotate your 50 images in your Roboflow project
- Go to Versions in the sidebar and click Generate New Version
- Set your train/valid/test split and configure your preprocessing steps. Keep augmentations off at this stage so you get a clean read on how your data performs on its own
- Click Generate, then hit Custom Train, select a model architecture, and start training
The model you get here isn't the one you'll ship. It's a signal. If it can detect your target at all with 50 images, the use case is worth scaling.
Step 2: Scale toward 500 images for production validation
Once that value is proven, the next step is to scale toward 500 images. The reason is simple. In a production setting, you need a meaningful test set to check whether the model is stable enough for real use. If around 10% of the data is kept for testing, then 500 images gives you about 50 test images, which is a much stronger basis for validation. Testing on only a few images does not give enough confidence in how the model will perform on the floor.
The steps in Roboflow are the same, but what you're configuring changes:
- Upload and annotate your expanded dataset in the same Roboflow project
- Go to Versions → Generate New Version
- This time, set a deliberate train/valid/test split, roughly 70/20/10, so you end up with around 50 test images for proper validation
- Now augmentations are worth considering: add only what reflects real conditions on your floor, nothing more
- Click Generate, then Custom Train to kick off training
The dataset you train on is a starting point, not a ceiling. The images that will make your model most accurate are the ones it hasn't seen yet, and they're already being captured on your factory floor.
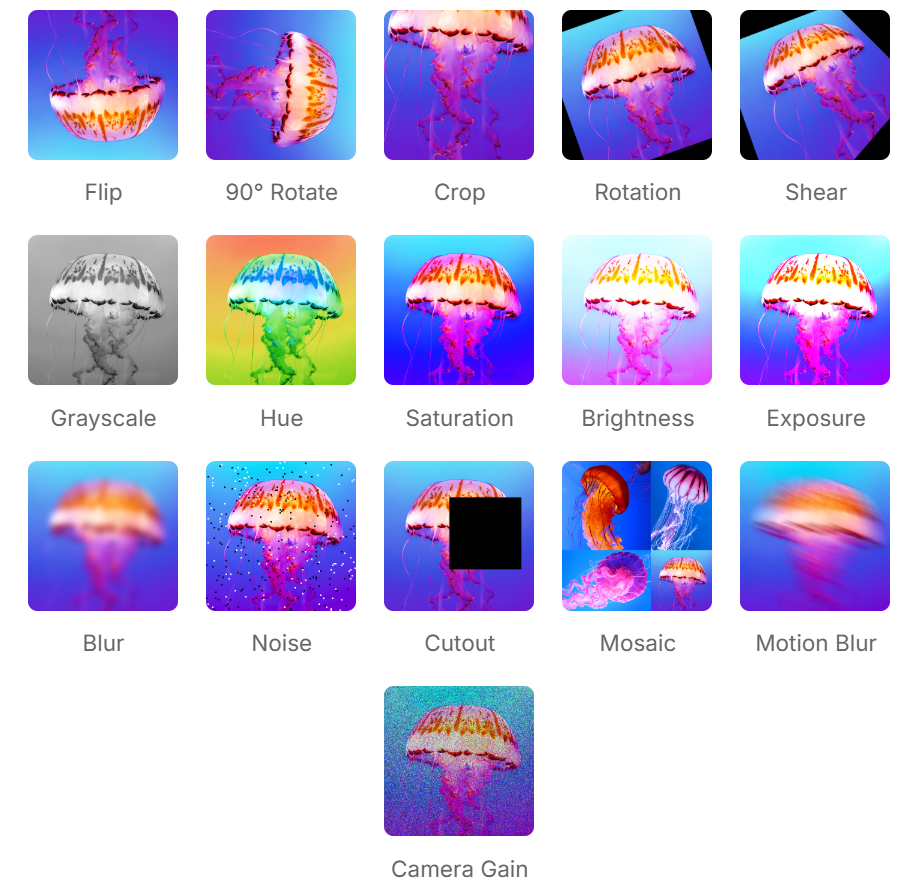
4. Augmentation Is Environment Simulation
A common mistake in model development is applying too many augmentations without a clear reason. It is easy to enable multiple options and expect a more robust model, but this often adds unnecessary noise and reduces performance.
Each augmentation should represent a real condition from your environment. If it does not reflect an actual variation on the factory floor, it may confuse the model instead of improving it. The goal is not to make the dataset more complex, but to make it more realistic.
Adding augmentations in Roboflow happens in the same version creation flow from the previous step, right below preprocessing when you generate a new version. Here is a breakdown of when each augmentation is worth including and when it isn't.
- Rotation: If products can appear in different orientations on a conveyor, such as 90-degree rotations, then rotation should be included. If the product always appears in the same orientation, adding rotated images can introduce unrealistic scenarios and reduce accuracy.
- Brightness & Exposure: Lighting conditions often change throughout the day. For example, sunlight from factory windows or variation in artificial lighting can affect how objects appear. Simulating these changes helps the model perform more consistently under different lighting conditions.
- Blur: If the camera or object may experience slight motion, focus variation, or vibration during operation, a small amount of blur augmentation can help. But if the camera is fixed and the image is always sharp, adding blur may only reduce model quality.
- Noise or Camera Gain: If the production camera sometimes produces grainy images because of low light or sensor limitations, then adding noise or camera gain can make the model more robust. If the real images are already clean, this should be avoided.
- Crop or Cutout: These can be useful when objects may be partially blocked, clipped at the frame edge, or not always fully visible. If full visibility is expected in every production image, these augmentations may not reflect reality.
- Shear or Perspective Variation: These are helpful only when the camera view or object alignment changes slightly in real operation. If the physical setup is standardized and the camera angle is fixed, these augmentations are usually unnecessary.
- Flip: This should only be used if the product can realistically appear in a mirrored direction. If left-right orientation has meaning, flipping can create false examples and confuse the model.
Augmentations help the model anticipate variation, but they're based on what you expect. Active learning is how you handle what you didn't.
5. Active Learning Infrastructure
In real production environments, a model does not stay accurate forever. The moment a new SKU appears on the line, a lens gets dirty, or the lighting changes, the model can begin to face data drift. That is why the system should not be treated as static after deployment. It should be designed to improve over time. Roboflow supports this by helping teams use production data to continuously strengthen the model.
- The Active Learning Loop: Do not stop at running inference; monitor the results. Set a filter in Roboflow Workflows to automatically flag low-confidence detections. A good starting point is 50% confidence. Anything the model returns below that threshold is worth flagging for review. As your model matures and baseline confidence rises, you can tighten that threshold to 60% or 70%. These uncertain predictions are where the model is telling you it needs more data.
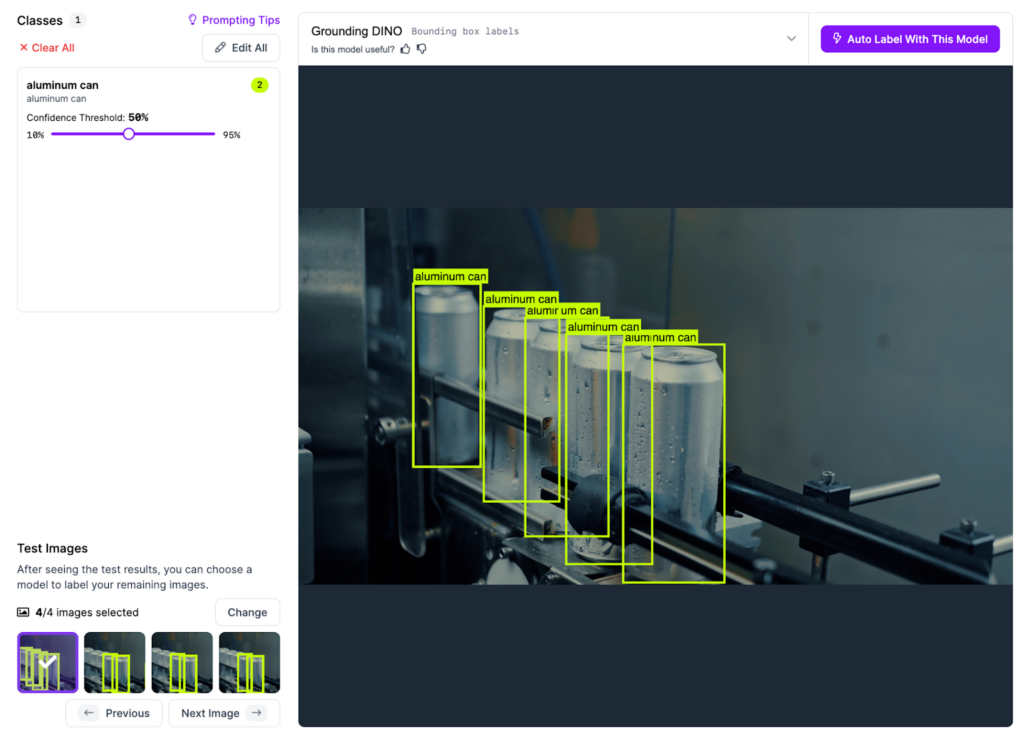
- Auto-Labeling at Scale: Once those hard images are identified, they can be sent back into the Roboflow dataset. Use Roboflow’s Auto-Label feature, a foundation model or your current best model for automatic annotations. A human reviewer can then verify those annotations in the Roboflow annotation tool, accepting, rejecting, or correcting each label in under 10 seconds per image instead of spending several minutes drawing bounding boxes from scratch.
- Retrain and Validate Before Pushing: Once the flagged images are labeled and added back to the dataset, generate a new dataset version in Roboflow and kick off a new training run. When the model comes back, don't deploy it immediately. Use Roboflow's model evaluation to check whether the new version actually improved. Compare precision, recall, and confidence scores against your previous version on the same test set. If the numbers move in the right direction, push it. If they don't, the flagged images may need another round of review before retraining.
This is how the loop is closed. You are not only deploying a model. You are deploying an infrastructure that can keep learning from the factory floor and become more reliable over time.
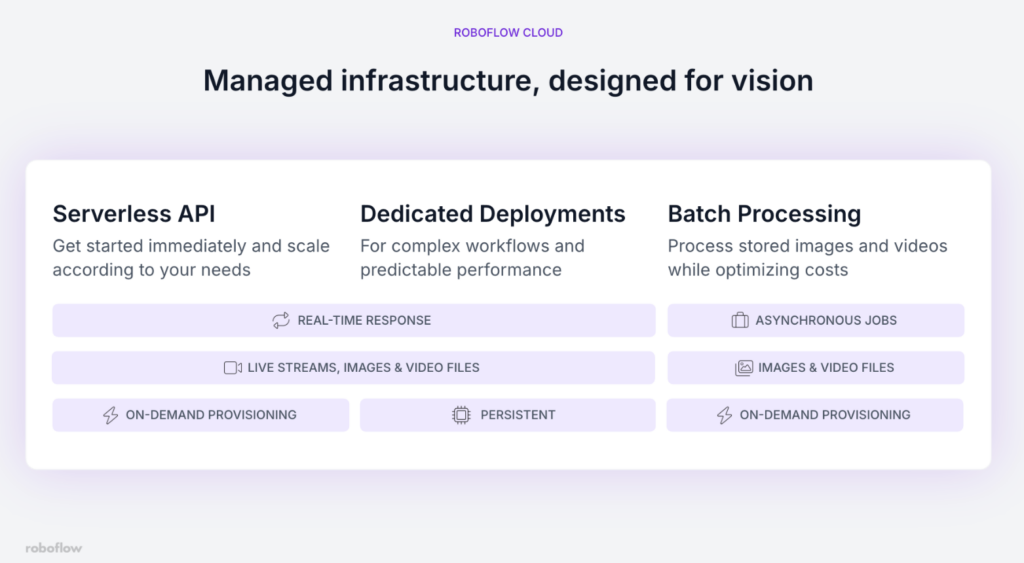
6. Deployment Infrastructure
A model with an active learning loop is only as useful as the infrastructure running it. Once your system is continuously improving, the next challenge is making sure it's deployed consistently and reliably across every line and every site it needs to cover.
The right Roboflow deployment architecture depends on your specific factory scenario. Here's how to choose:
- You're still validating or running low-frequency inspections: Start with the Serverless API. It requires no infrastructure setup, scales automatically, and gets you running in minutes. The tradeoff is that it runs on CPU, so latency is higher - this matters less when you're processing images on demand rather than a continuous live stream.
- You're running live production lines that need consistent, low-latency inference: Use a Dedicated Deployment. You get a GPU-backed server with isolated resources, predictable performance, and support for heavier models. This is the right call when a delayed detection means a defective part has already passed the inspection point.
- Your facility has limited or unreliable internet connectivity: Deploy on-device using Roboflow Inference on an edge device like an NVIDIA Jetson. The model runs locally, inference happens without an internet connection, and your production line stays up even if connectivity drops.
- You need to process stored images or run audits on historical footage: Use Batch Processing. It handles large volumes of data without coding overhead and is significantly more cost-effective than running a dedicated deployment for non-real-time work.
Once your deployment architecture is chosen, Roboflow's Device Manager lets you push Workflow updates, monitor device health, and manage your entire fleet from a single dashboard, without touching each device individually.
Master Vision AI Deployment with Roboflow
Roboflow is designed to support deployment by providing tools to manage the full lifecycle, from the first frame captured by the camera to final inference at the edge.
Whether the use case is counting parts on a conveyor or tracking more complex visual patterns, the goal is the same, to convert visual data into actionable logic that supports real operations.
The physical world can now be treated as programmable. Speak with a Roboflow AI expert to learn more.